Create an iOS app in Swift
EditThis page gives you a few hints for integrating the Vidinoti SDK in a Swift application.
See a working demo application: https://github.com/vidinoti/swift-demo-app
Requirement / getting started
Follow the steps described in Create an app - Basics. In summary, do the following:
- Connect to V-Director
- Download the latest iOS SDK version under “SDK” > “Downloads”
- Retrieve your license key under “SDK” > “Licenses”. Copy it somewhere, you will need it later.
- Open the section “SDK” > “My Applications”.
- Create a new application with your application bundle ID. It is important that the registered bundle ID corresponds to your application otherwise the SDK won’t be able to connect to the backend. If you use several bundle ID (e.g. for staging), add each of them as a new application.
Import SDK into Swift app
- Copy
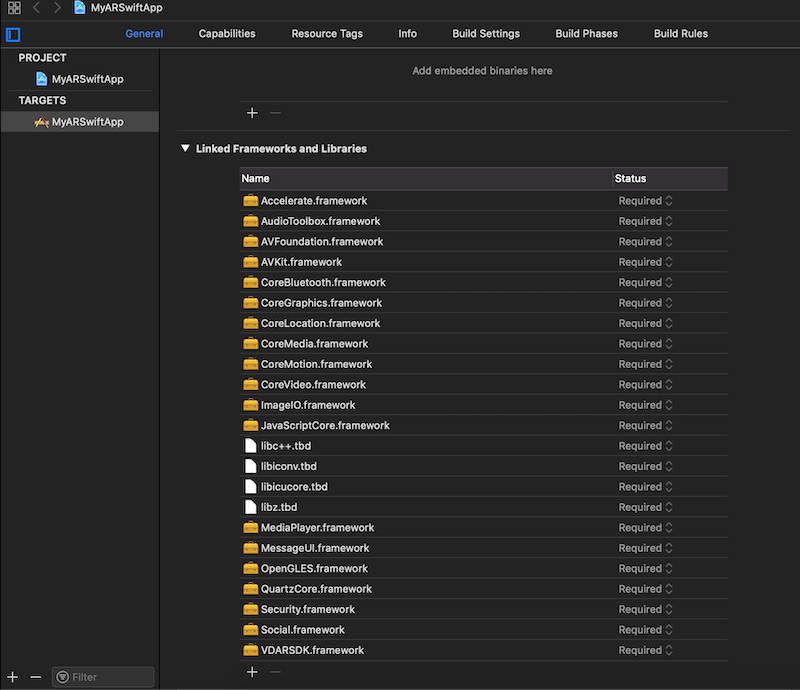
VDARSDK.frameworkinto your Xcode project. - Open your project settings and select your app target in the “General” tab.
- Add
VDARSDK.frameworkin the section “Linked Frameworks and Libraries”. -
Add below required frameworks.
- Accelerate.framework
- ARKit.framework
- AudioToolbox.framework
- AVFoundation.framework
- AVKit.framework
- CoreBlutooth.framework
- CoreGraphics.framework
- CoreLocation.framework
- CoreMedia.framework
- CoreMotion.framework
- CoreVideo.framework
- ImageIO.framework
- JavaScriptCore.framework
- libc++.dylib
- libiconv.dylib
- libicucore.dylib
- libz.dylib
- MediaPlayer.framework
- MessageUI.framework
- Metal.framework
- MetalKit.framework
- OpenGLES.framework
- QuartzCore.framework
- QuickLook.framework
- Security.framework
- Social.framework
- UserNotifications.framework
- WebKit.framework
-
Open now the “Build Settings” and add
-ObjCto “Other Linker Flags”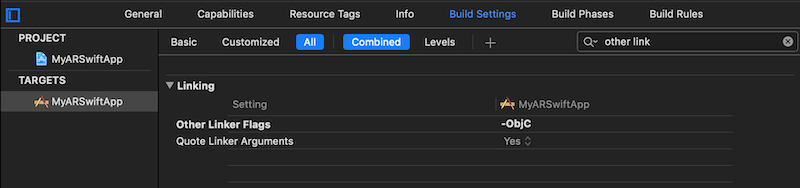
- We will now create a bridging header. Xcode can create one for you. Select “File” > “New” > “File…” and create a new Objective-C file (the filename is not important, we will delete it later).
-
Xcode will ask you if you want to create a Bridging Header. Click “Create Bridging Header”.
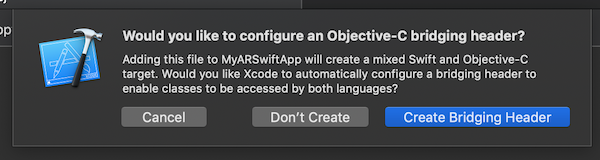
- Delete the Objective-C file you have just created. You don’t need it anymore. It has just been used for creating the bridging header.
-
Open the bridging header file. It is usually called
<App name>-Bridging-Header.hand add the following line.#import <VDARSDK/VDARSDK.h>
Initialize the SDK
-
Open your AppDelegate and add the following into the
application(_:didFinishLaunchingWithOptions:)method.func application(_ application: UIApplication, didFinishLaunchingWithOptions launchOptions: [UIApplication.LaunchOptionsKey: Any]?) -> Bool { let documentPath = NSSearchPathForDirectoriesInDomains(.documentDirectory, .userDomainMask, true)[0] as NSString let documentPathString = documentPath.appendingPathComponent("models") guard let controller = VDARSDKController.startSDK(documentPathString, withLicenseKey: licenseKey) else { fatalError("Error loading Vidinoti SDK") } controller.imageSender = VDARCameraImageSource() return true } -
And the following
 func application(_ application: UIApplication, didReceive notification: UILocalNotification) {
     VDARSDKController.sharedInstance()?.application(application, didReceive: notification)
 }
 func applicationWillResignActive(_ application: UIApplication) {
     VDARSDKController.sharedInstance()?.save()
 }
 func applicationDidEnterBackground(_ application: UIApplication) {
     VDARSDKController.sharedInstance()?.save()
 }
Synchronization
The application needs to synchronize with V-Director for retrieving the contents to recognize. For synchronizing, see the following code
    func synchronize() {
        if syncing {
            return
        }
        syncing = true
        VDARSDKController.sharedInstance()?.afterLoadingQueue.addOperation {
            DispatchQueue.main.async {
                VDARRemoteController.sharedInstance()?.syncRemoteModelsAsynchronously(withPriors: [], withCompletionBlock: {result, error in
                    syncing = false
                    if let error = error {
                        print("The system got an error during synchronization: \(error)")
                    }
                })
            }
        }
    }
The synchronization should usually be done when the application starts. For example, it can be called from the method applicationDidBecomeActive of your AppDelegate.
You must avoid doing several synchronization at the same time.
If you don’t want to retrieve all the contents of your V-Director account, you can use tags for organizing your contents. You can then sychronize only with some tags like shown below.
    let priors: [VDARPrior] = [VDARTagPrior(tagName: "MyTag")]
    VDARRemoteController.sharedInstance()?.syncRemoteModelsAsynchronously(withPriors: priors, withCompletionBlock: {
Multilingual contents also work with special tags. If you want to retrieve only the content of a given language, you must synchronize with the tag “lang_LanguageCode>”. For instance, if you want to synchronize with the contents in French, use the tag lang_fr.
Add AR view
We will now add the AR scanner view.
-
For accessing the camera, the application must declare its usage of the camera. Edit your app’s
Info.plistand add a description for the keyNSCameraUsageDescription
-
Modify your application such that your app contains a
UIViewControllerthat extendsVDARLiveAnnotationViewController. TheVDARLiveAnnotationViewControllercontains the camera view and handles the interaction with the AR contents.
Additional hints
- Show a progress indicator if the application is synchronizing. The image recognition does not work when the synchronization process is in progress.
- You will also need to add the key
NSLocationAlwaysAndWhenInUseUsageDescriptionto yourInfo.plistfile if your application may synchronize with GPS or beacon contents. - Explore the demo application: https://github.com/vidinoti/swift-demo-app
Having problems?
Checkout this section for common issues and solutions.
<VDARSDK/VDARSDK.h> not found

If you encounter the above error, check the followings:
- Did you properly add the
VDARSDK.frameworkto the list of frameworks in your target. - Are you importing the framework in the bridging header?
-
Is the bridging header properly configued?

-
Did you copy the file
VDARSDK.frameworkinto your project and the Framework search paths are properly configured?